Privacy statement: Your privacy is very important to Us. Our company promises not to disclose your personal information to any external company with out your explicit permission.
First, the scope
This standard specifies the technical requirements and test methods for zinc-nickel alloy plating on nickel with a nickel content (mass fraction) of 5% to 10% (low nickel) and 10% to 17% (high nickel).
This standard is applicable to zinc-nickel alloy coatings of zero (parts) parts of automobiles, aerospace and weapons.
This standard does not apply to:
- parts with a tensile strength greater than 1200 MPa or a Vickers hardness greater than 370 HV;
- fasteners (bolts, nuts, etc.) with a quality rating greater than 10.9;
- Parts in contact with magnesium material.
Second, terms and definitions
The following terms and definitions as defined in GB/T 3138 and GB/T 12334 apply to this document.
White fog white smog
Under the action of corrosive media, white oxide appears at the micro-cracks of the coating, which causes a slight change in the initial color of the coating.
White rust white rust
Under the action of corrosive medium, the passivation film layer and the sealing film layer on the surface of the coating are destroyed, and the coating layer is corroded to form powdery white corrosion products.
Note: White rust is usually considered as the first corrosion point.
3. Red rust red rust
Under the action of corrosive medium, the surface coating of the parts is destroyed, and the matrix is corroded to form spot-like (point) red corrosion products.
Note: Red rust is usually considered as the second corrosion point.
Third, the logo of the coating
Identification method
According to the provisions of GB/T 13911, the composition of the plating mark is as follows:
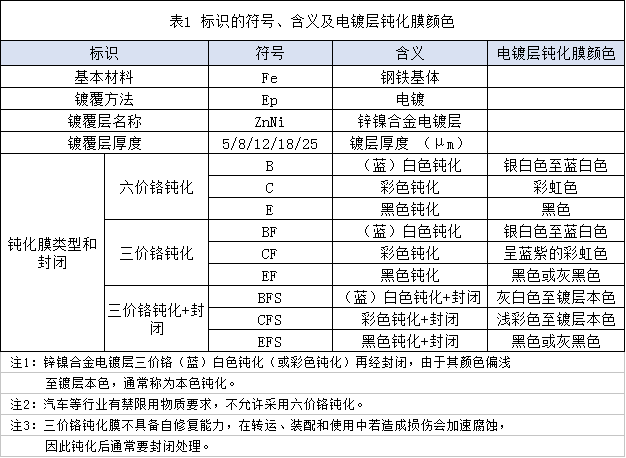
Plating method This standard No. - Base material / plating method · Name of plating layer and thickness of plating layer · Type of passivation film and symbol of the closed indication mark, and the color of the passivation film of the plating layer are shown in Table 1 of this standard.

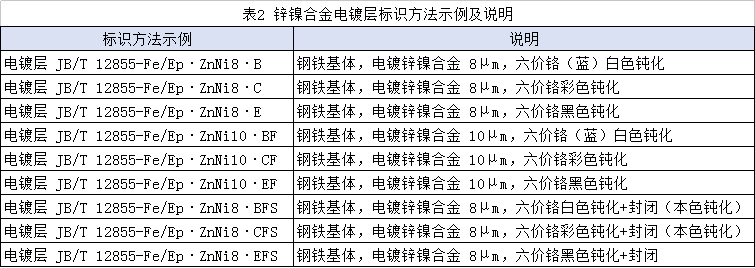
2. Identification example
See Table 2 for examples and descriptions of zinc-nickel alloy plating coating methods.

Fourth, plating technical requirements
Appearance
1) General requirements
The coating on the main surface of the workpiece is dense, uniform, smooth and flat, and the color of each batch of passivation film should be consistent. The color of the zinc-nickel alloy plating passivation film is generally shown in Table 1.
2) Allowable defects
The defects allowed for the coating are:
1 Slight water or uneven color.
2 A slight fixture is allowed on the coating of the non-essential surface of the workpiece.
3 The difference in color and gloss of the same workpiece caused by the difference between the workpiece base material and the surface state.
4 Roughness and accumulation at the edges, edges and corners of complex and large parts, but should not affect the quality and performance of the assembly.
5 After the hydrogen removal of the workpiece, the color of the film after passivation is slightly dark or uneven.
6 blind holes (or grooves, slits) having a diameter (or width) of not more than 10 mm, allowing a partial uncoated layer at a surface having a depth greater than the diameter (or width); a through hole having a diameter of not more than 10 mm at a depth greater than twice the diameter The surface allows for partial unplating.
3) No defects allowed
The defects that are not allowed in the plating are:
1 Coating peeling, foaming, charring, pits, nodules, spots, burrs, shedding, roughness, pinholes and orange peel.
2 Dendritic, spongy and striped coatings.
3 Partially uncoated, except as otherwise specified.
4 Unwashed bath salt or passivation residue.

2. Alloy proportion, thickness and corrosion resistance of the coating
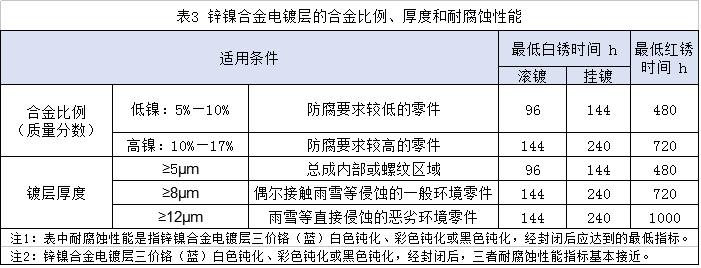
The relationship between the alloy proportion, thickness and corrosion resistance of the coating is shown in Table 3.
3. Bond strength
The plating layer and the base metal should be well bonded, and there should be no defects such as blistering, falling off, peeling, and peeling.
4. Corrosion resistance
After the plating neutral salt spray test:
1 Allow the passivation layer to change color and appear white fog.
2 Decorative exterior parts are not allowed to appear white rust.
3 Non-appearing workpieces are allowed to have white rust of no more than 5% area, but red rust is not allowed.
4 Cast iron workpieces are allowed to have white rust of no more than 5% area and red rust of no more than 3% area.
5 Threaded areas that are not visible after installation allow white rust of no more than 10% area and red rust of no more than 5% area.
6 Riveting, welding and other local parts are allowed to reduce the requirements for evaluation, which is specifically negotiated between the supplier and the buyer.
5. Coefficient of friction
The coefficient of friction of the threaded fastener is 0.08-0.20.
6. Prohibited substances
When automotive, electronic components, etc. have requirements for prohibited substances, they should be passivated with trivalent chromium. The content of hexavalent chromium in the coating should not exceed 0.1 μg/cm2.
7. Heat treatment to eliminate hydrogen embrittlement
After electroplating zinc-nickel alloy, if there is a requirement to eliminate hydrogen embrittlement, heat treatment for eliminating hydrogen embrittlement should be carried out. The specific requirements are shown in Table 4.

Five, coating test method
Appearance
Visual inspection was performed approximately 500 mm from the test surface under white transparent light with or without natural light.
2. Alloy ratio
The thickness of the coating and the alloy composition (alloy ratio) were measured simultaneously according to the measurement method specified in GB/T 16921.
3. Thickness
The thick layer of the coating shall be measured according to the provisions of GB/T 16921. When the opinions of both parties are inconsistent, it shall be measured according to the provisions of GB/T 6462.
4. Bond strength
Place the plated workpiece in a drying oven at a temperature of 330 °C ± 5 °C, keep it for 30 minutes, then immerse the workpiece in water at a temperature of 20 °C ± 5 °C. After a few seconds, squint the visual inspection. The plating layer should be visible. Defects, in line with the requirements of 6.3.
5. Corrosion resistance
Store the workpiece for at least 24 hours after plating, and heat it to 120 °C ± 2 °C in a dry box for 1 h. When the workpiece temperature is lowered to room temperature, the workpiece is sent to the salt spray box, and the corrosion resistance test is carried out according to the neutral salt spray test method specified in GB/T 10125. The performance should meet the requirements of Table 4; after the test, according to GB/T The rating is 6461 and the protection level should not be lower than 9.
6. Coefficient of friction
According to the test method specified in GB/T 16823.3, according to the test purpose, the test method under standard conditions or special conditions is selected, and the torque characteristics of the fastener are measured to determine the total friction coefficient, the friction coefficient between the threads and the friction of the bearing surface.
7. Prohibited substances
The hexavalent chromium content of the chromate film is determined by the test method specified in GB/T 9791:
- first the determination of the presence of chromate film hexavalent chromium;
- After confirming the presence of hexavalent chromium, the determination of the hexavalent chromium content of the chromate film is carried out.
July 03, 2023
July 03, 2023
July 03, 2023
이 업체에게 이메일로 보내기
July 03, 2023
July 03, 2023
July 03, 2023

Privacy statement: Your privacy is very important to Us. Our company promises not to disclose your personal information to any external company with out your explicit permission.

Fill in more information so that we can get in touch with you faster
Privacy statement: Your privacy is very important to Us. Our company promises not to disclose your personal information to any external company with out your explicit permission.